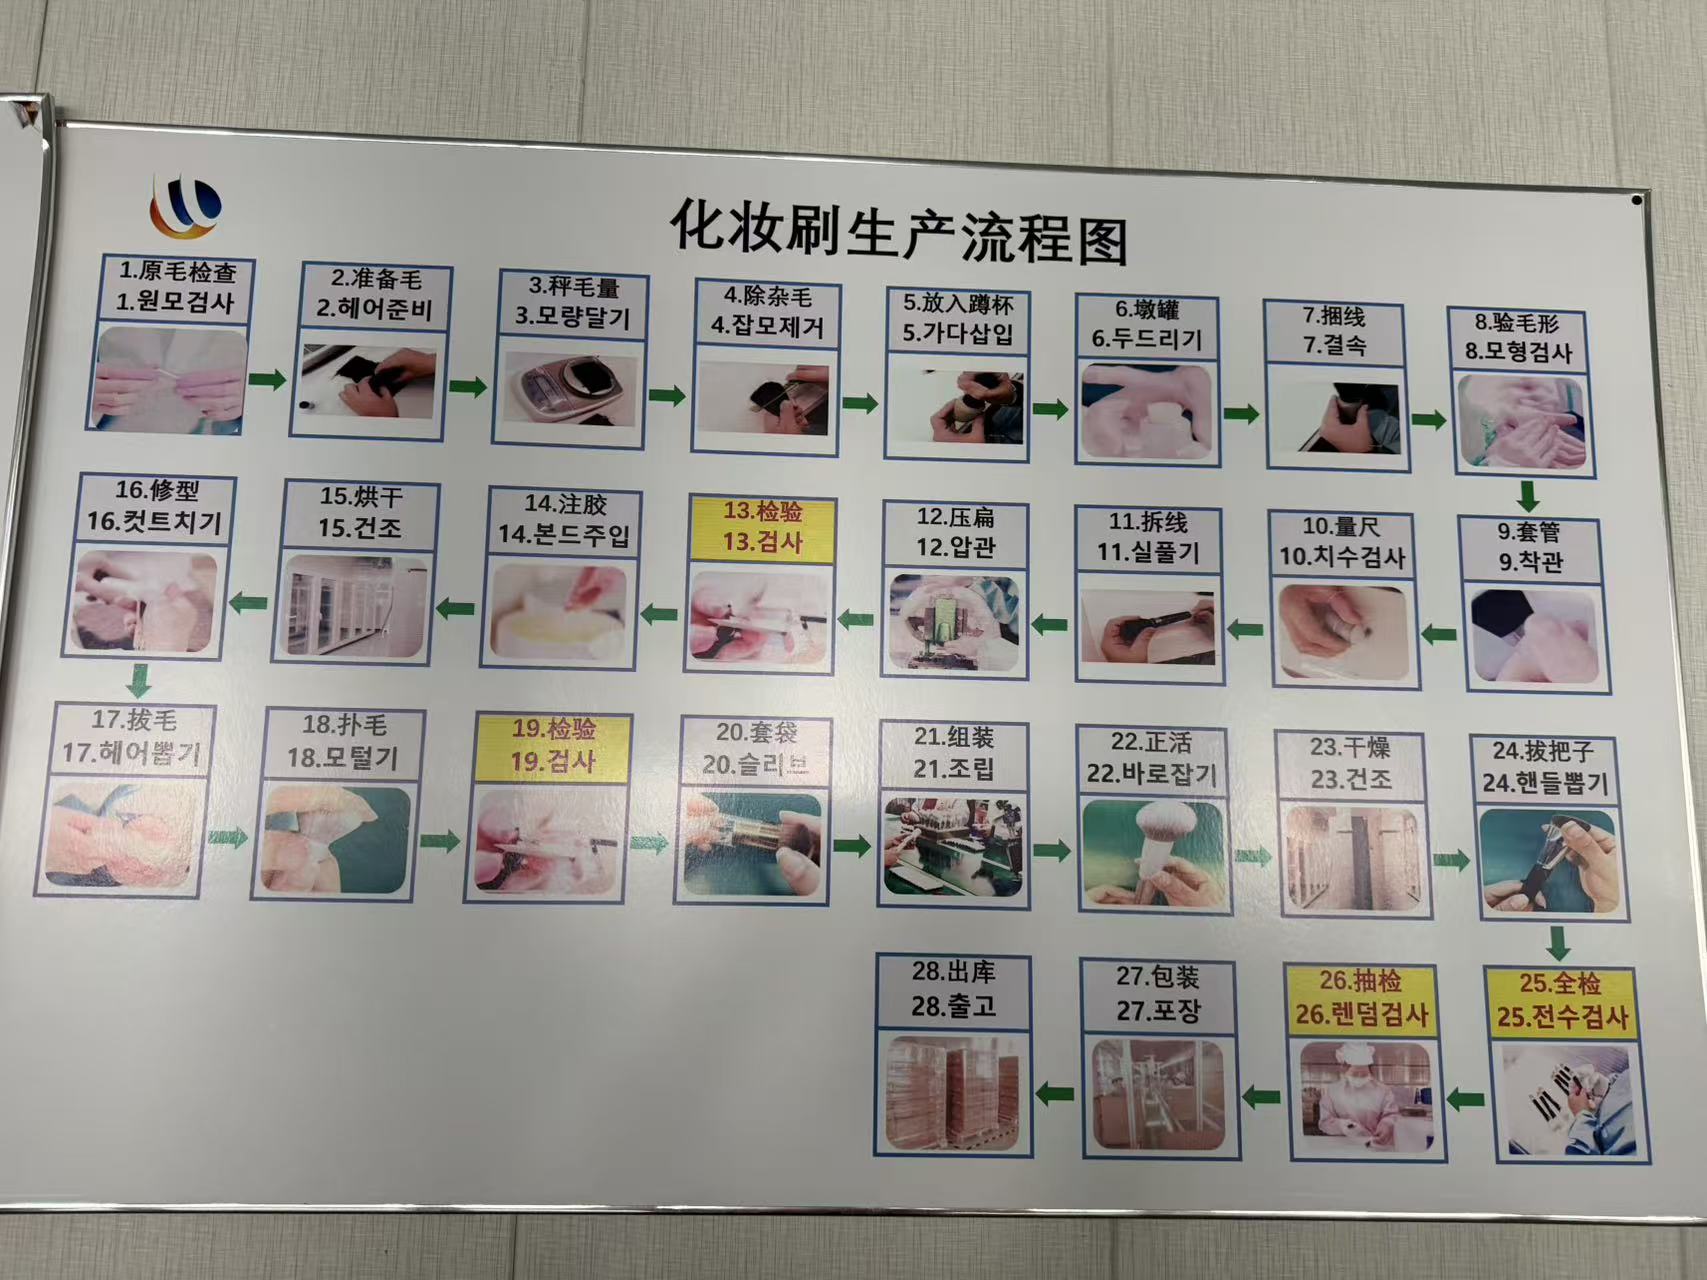
A brush takes shape through material preparation, head shaping, component assembly and inspection. Follow the numbered workflow, then bring the details that matter to your sample review.
AI process illustrations explain the recorded workflow. They are not photographs of our workshop. See the on-site photographs
Chapter 01 · Steps 1—4
Material preparation
Which material and preparation requirements belong in the specification?
01Inspection
Incoming bristle inspection
Check the incoming bristles against the material and sample requirements.
Sample discussion: Identify the fibre and approved reference, not only its colour.
Factory board reference
1. 原毛检查
02
Bristle preparation
Prepare the bristles for the selected brush head.
Sample discussion: Record the blend and preparation for this design.
Factory board reference
2. 准备毛
03
Bristle weighing
Weigh the bristles for the intended bundle.
Sample discussion: Compare fullness as well as the specified bundle weight.
Factory board reference
3. 秤毛量
04
Removal of unwanted fibres
Remove unwanted fibres before forming the head.
Sample discussion: Look for unwanted fibres against the agreed appearance sample.
Factory board reference
4. 除杂毛
Chapter 02 · Steps 5—8
Head shaping
Does the profile match the intended application?
05
Place the bristles in a shaping cup
Place the prepared bundle into a shaping cup.
Sample discussion: Match the cup profile to the requested head outline.
Factory board reference
5. 放入蹲杯
06
Tap the cup to shape the bristle bundle
Tap the cup to settle the bristles and form the profile.
Sample discussion: Compare the settled tip shape with the approved sample.
Factory board reference
6. 墩罐
07
Tying the bristle bundle
Tie the formed bundle for the next handling stage.
Sample discussion: Check that handling preserves the formed profile.
Factory board reference
7. 捆线
08Inspection
Bristle-profile inspection
Check the formed bristle profile.
Sample discussion: Review the front and side silhouette.
Factory board reference
8. 验毛形
Chapter 03 · Steps 9—15
Ferrule fitting and bonding
Are the dimensions and component fit agreed?
09
Ferrule fitting
Fit the prepared head into the ferrule.
Sample discussion: Compare ferrule opening and exposed bristle length.
Factory board reference
9. 套管
10Inspection
Dimensional check
Check the dimensions at this stage of assembly.
Sample discussion: Use named measurement points and agreed tolerances.
Factory board reference
10. 量尺
11
Removing the temporary tie
Remove the temporary thread used to hold the bundle.
Sample discussion: Review the bundle after the temporary tie is removed.
Factory board reference
11. 拆线
12
Ferrule pressing
Press the ferrule to the required profile for the construction.
Sample discussion: Check the intended round or flattened ferrule profile.
Factory board reference
12. 压扁
13Inspection
In-process inspection
Inspect the assembly before the adhesive stage.
Sample discussion: Check fit and alignment before the bonded joint becomes fixed.
Factory board reference
13. 检验
14
Adhesive application
Apply adhesive to secure the bristle assembly.
Sample discussion: Agree the adhesive specification and compatible component materials.
Sample discussion: Review stray hairs without changing the agreed silhouette.
Factory board reference
17. 拔毛
18
Loose-fibre removal
Remove loose fibres as part of head finishing.
Sample discussion: Agree a repeatable shedding check and acceptance criteria.
Factory board reference
18. 扑毛
19Inspection
Finishing inspection
Inspect the head after finishing.
Sample discussion: Compare outline, dimensions and visible finish with the sample.
Factory board reference
19. 检验
20
Protective sleeving
Apply a protective sleeve before subsequent handling.
Sample discussion: Check protection without crushing or bending the working head.
Factory board reference
20. 套袋
Chapter 05 · Steps 21—24
Handle assembly
How should alignment and connections be reviewed?
21
Handle assembly
Assemble the handle and prepared head components.
Sample discussion: Compare handle, ferrule and logo orientation together.
Factory board reference
21. 组装
22
Alignment adjustment after assembly
Adjust alignment after assembly and before drying.
Sample discussion: Review straightness from more than one viewing angle.
Factory board reference
22. 正洁
The English explanation is interpreted from the board and sequence. Confirm the precise operation for your product.
23
Drying
Dry the handle assembly under the agreed bonding conditions.
Sample discussion: Confirm handling strength and full cure requirements separately.
Factory board reference
23. 干燥
24
Handle pull check after drying
The board shows pulling the handle after drying. The connection-check purpose is interpreted from its place in the sequence; force, duration and acceptance criteria remain project-specific.
Sample discussion: Specify the test method, force, duration and acceptance rule.
Factory board reference
24. 拔把子
The English explanation is interpreted from the board and sequence. Confirm the precise operation for your product.
Chapter 06 · Steps 25—28
Final review, packing and dispatch
What is inspected, how is the lot sampled, and how is the order packed?
25Inspection
Full inspection
The board identifies a full-inspection stage. Agree which visual and assembly checks are included for each item.
Sample discussion: List exactly which features are checked on every item.
Factory board reference
25. 全检
26Inspection
Sampling inspection
The board identifies a sampling stage. Agree the lot, selection method, checks and acceptance rules.
Sample discussion: Agree lot size, sample selection, defect classes and decision rules.
Factory board reference
26. 抽检
27
Packing
Pack the products and check the agreed set contents, protection and labelling.
Sample discussion: Check counts per set, head protection and approved artwork.
Factory board reference
27. 包装
28
Dispatch
Release the packed goods for dispatch against the order and packing documents.
Sample discussion: Match released quantity and carton details to the order.
Factory board reference
28. 出库
Understand the process
What the steps mean for your sample.
The 28 numbered operations follow the supplied factory flow board. The explanations below add published industry context. The sample-discussion prompts are a purchasing checklist, not a claim that a test or certification has already been completed.
How is a makeup brush head shaped?
A shaping cup or mould helps arrange the bundle into a profile. In the traditional process documented by Chikuhodo, fibres settle in a shaped frame, the base is secured and the head is refined before metal fitting and handle assembly. This explains the principle behind several steps above; it does not mean every material or brush construction follows an identical method.
Why is there no single drying time for every custom brush?
The adhesive and the assembly conditions matter. Henkel describes how temperature and the mass of a two-part epoxy can affect curing. Its epoxy guidance is an example, not a specification for the adhesive in your brush. For your project, request the selected adhesive technical data and distinguish safe handling from full cure before agreeing assembly and connection checks.
Does sampling inspection mean every brush was tested?
No. Acceptance sampling uses selected items to make a decision about a lot. ASQ distinguishes attribute-based and variable-based sampling plans. An every-item visual check and a lot-sampling plan answer different questions. Define the features, defect classes, lot, sample selection and acceptance rules for the order; a sampling pass does not certify that every piece has no defects.
References reviewed 29 September 2026. These independent sources explain techniques; they do not endorse PRETTY or verify its equipment, production capacity or test results.
This sequence follows our supplied manufacturing board for bristle brushes. Non-bristle tools and different constructions can require other operations. Inspection coverage, test methods and acceptance criteria are agreed for each project.